I promised to Anon-ssi not long ago that I would post a tips on how to get rid of blackheads so here’s a post for you guys about blackheads! Prepare your eyes and soul because this gonna be looooong. *^*


Blackheads are tiny, dark spots caused by a small plug in the opening of a follicle (pore) on the skin. In medical terms, blackheads are known as open comedones. Despite their name, some blackheads can be yellowish in color. A blackhead is the outcome of the accumulation of excess sebum (oil) accompanied by dead skin cells in the sebaceous glands’ ducts, which in turn clogs the skin pores and invites bacteria to take over them. When this deposit of oil, dead skin cells and bacteria is exposed to oxygen, it reacts and turns black, acquiring the form of a blackhead. When bacteria is added to these comedones, the condition can lead to pimple, which is also known as a papule or pustule.

If Blackheads are known as open comedones, Whiteheads are known as closed comedones. Closed comedones are follicles that are filled with the same material as open comedones, but have only a microscopic opening to the skin surface thus the material is not oxidized (because the air cannot reach the follicle) and remains white. The differences are whether it’s oxidized or not and the names.
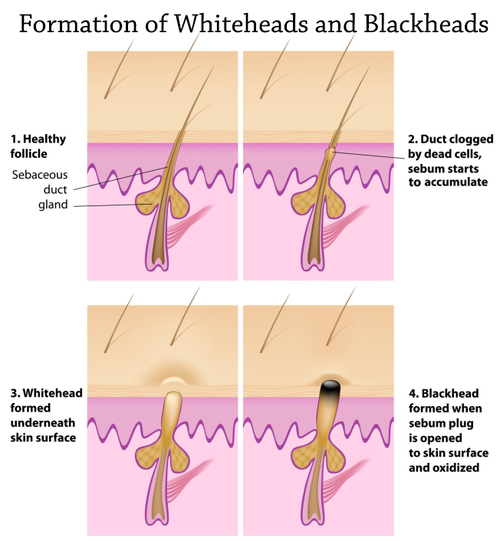
The duct is clogged by the dead cells thus the sebum starts to accumulate which lead to whitehead or blackhead formation.
Causes of Blackheads
1. The overproduction of oil is the main cause of the emergence of blackheads. This is likely to occur in a high proportion of humans during puberty. Spikes in hormone production can result in the high levels of DHT(dihydrotestosterone), a hormone which triggers overactivity in the oil glands, resulting in clogged pores.
2. Skincare products also contribute to the development of blackheads. On coming into contact with the body’s natural oil, they further the accumulation of oil and consequently block the skin pores.
3. Make up which is not cleaned properly. Improperly cleaned skin makes it more likely that dead skin cells build up within the pores. The pore openings can become clogged, which accelerates the build up of oil inside - thus causing blackheads to form.
4. In some cases, blackheads can emerge if moisturizers, sun screens, make up, or foundations are overused.
The main important question is, how to get rid of BLACKHEADS?
Actually, it’s facile to get rid of blackheads but the hard thing is to keep our skin clear from blackheads. There are numerous methods available out there to get rid of blackheads. But the main key is to PRACTICE A GOOD HYGIENE. Even if you do all methods suggested but never keep a good hygiene, it won’t work. So remember, be as sanitary as you can. If you’re already familiar with how to get rid of blackheads, try guess what tools are used in Method 1, Method 2 etc. Have fun with guessing and congrats if you get them right! Before I forget, the first important step to get rid of blackheads is ;

That’s right, open your pores people. Open doesn’t literally means “open”. It literally just a term, the pores do not in fact open or close. It has nothing to do with changing the size of your pores. It’s simply an effective way of cleaning them out, and getting rid of excess debris and makeup. Before doing any methods I will suggest after this, open your pores first and foremost. How to open your pores? It’s quite effortless and can be done at home. No need to rush to beauty saloon or whatever to get this done. One of the easiest ways is bt putting your face over a sink or a bowl filled with steaming-hot water (be sure to be careful not to let your skin come in touch with the water!) and remain in this position for 5 to 10 minutes, allowing the steam to unclog your dirty pores and do away with blackheads. The other simple way is by cover your face with a wash cloth soaked in hot water. This can be done by soaking the wash cloth in the hot water or simply wet the wash cloth and then put it in microwave (but honestly I don’t recommend this method and I prefer the first method I suggested because it’s more hygienic and much more easier to do the first one than second one). The last most easiest way is by taking a warm shower.

# METHOD 1 : Fast removal, quite hurt, need effort & quite harsh.
This is recommend to those who in need to get rid of their blackheads fast. You can use this method if you suddenly have a sudden date with your namchin/ namja-chingu (남친) / Kare (彼) - (Korean & Japanese words for boyfriend) and really need to get rid of your blackheads fast BUT THIS METHOD ACTUALLY IS NOT REALLY RECOMMENDED BY ME ;^; It takes more effort than the other methods and it’s quite harsh also hurt a little tiny bit but it’s the most fastest way among all. Can you guess yet what is used for this method? It’s blackhead extractor! It’s more commonly known as Comedone Spoon Extractor. A comedone extractor is a tool usually made from steel that you can position against your skin and use to pull blackheads from their roots. There’s two types of Comedone Extractor, one is called Comedone “Loop” Extractor and the other one is Comedone “Spoon” Extractor. The differences between these two are the size of the spoon and the size of your blackheads. A Comedone Loop Extractor works similar to the Spoon Extractor and is positioned around one blackhead at a time for the extraction process. It’s more suggested to buy a Comedone Spoon Extractor if you have large-sized or multiple blackheads while buy a Comedone Loop Extractor if you have a small-sized or smaller amount of blackheads. But worry not, there are Comedone Spoon Extractor and Comedone Loop Extractor in just one tool, so you don’t have to spend extra money if you want to get both sizes. This method actually is an alternative to using your fingers to squeeze the blackheads out and this method actually better than using your own fingers as it’s slightly easier to get the blackheads out by using this tool rather than using your fingers. It’s not recommendable because by using extractors or your fingers may permanently scar your skin if you do not apply gentle pressure to the tool during the extraction process and some of you may notice your skin will start flaking/peeling after 1-3 days of the extraction process. How the extractor looks like? It looks like this :
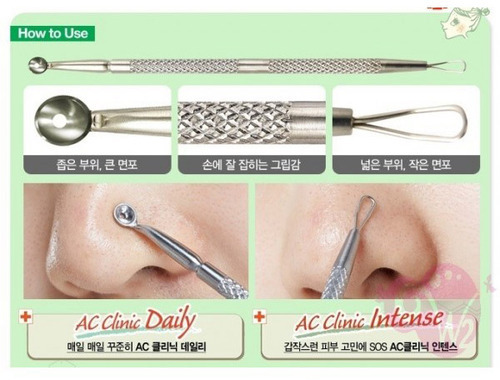
This is how the extractor looks like and this one is from Etude House. I believe you can try find the extractor on your local pharmacy or you can get it from Etude House stores as well. I get mine from Etude House and honestly it’s just like using your fingers but better and easier also much more effective on getting the blackheads out. There’s a limit on how many or how much blackheads you can get rid of by using fingers but by using the extractor, it is almost like no limit to it. It’s more hygienic too as it’s easier to clean the extractor from all the gunk. So if you’ve no problem using your fingers to pick on your blackheads before, I believe you can opt for the extractor the next time. If it’s your first time using the extractor, be careful not to put much pressure and try on one spot first and see how your skin will react. If nothing happens, it’s fine to continue using it. If the next 1-3 days you notice there’s flakiness/peeling on your skin, try avoid using the extractor especially if you have any occasion on the next 1-3 days after the extraction process since nothing could stop the peeling and you don’t want other people to see the peeling, yes? no? The peeling occurs because you were being harsh to your skin so again I’m telling you it’s better try to avoid using this method especially if you’re experiencing peeling effect after the extraction process but still if you’re stubborn about it, it’s actually fine if you just do the extraction like once in a month but make sure you don’t have any occasion on the next 1-3 days as well. How to use the extractor? Always start with opening your pores then continue using the extractor. Apply a little pressure just like how you squeeze the blackheads by using your fingers and clean the extractor after using at one spot continue using at another spot then clean it back as well. Always clean the extractor after using on each different spots. When finish using, clean your nose and finish up with closing your pores by using a serum that is specialized to close the pores. Last extra step that you can do or you can simply ignore is by tightening your pores again. After the serum dries, you can use ice or put a wet towel that you put on the fridge on your face to close the pores again. You would be able to see fast result and your nose would be free from most of the blackheads for more than weeks and you can keep your nose clear for a longer time if you practice a better hygiene or follow up this method by using method 2. I write too long, forgive me if there’s a repetitive in my sentence. I believe I’ve mentioned before (as far as I’ve remembered), but again, this method not really I recommended especially if cause peeling effect to your skin ; unless if you’re in a real hurry. Please try use other methods available and avoid using this method.
# METHOD 2 : Quite Fast, doesn't hurt, effortless & on a safer side.
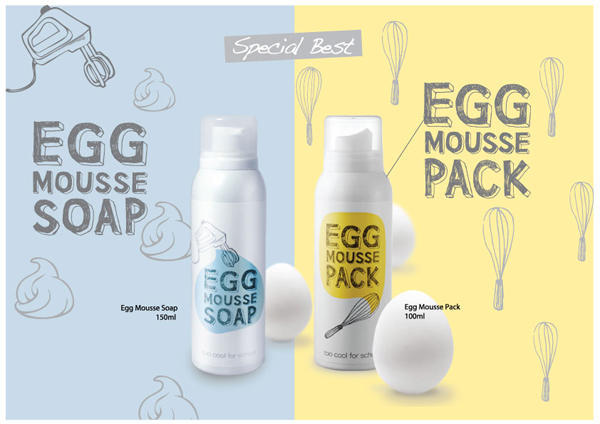
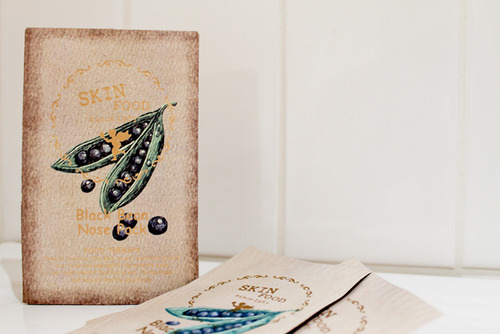
Can you guess what is the second method? It’s considerably fast, totally painless, can be say effortless and definitely safer. What it is? It’s the Pore Strip or usually it’s called Nose Pack. It takes 10-20 minutes usually for you to see the effect as you have to let the pack dries first before you can peel it. How to use? Don’t forget the first step is to open your pores (here again I’m reminding you for the third time XD). Basically they are usually a black strip which you apply the one with glue side to your wet nose, let it sit on your nose for around 10-20 minutes (depends on which Pore Strip/Nose Pack you use) or leave it to dry and then pull off. The strip tightens as it dries latching onto the blackheads and dirt on your skin which is then pulled off as you remove the strip. Pretty simple really. This method definitely better than the first method but I won’t recommend you use it many times on 1 week either. Just make sure there’s a gap during using it. But the good usually of course has its cons too. It might be painless, safer, effortless and considerably fast but not really all of the blackheads are removed by using this method. Usually it will only ‘pick’ the blackheads which already sticking out (which is why it’s important to do the first step - open your pores (lol sorry for reminding you again) ) so it might take awhile for all the blackheads to be removed by using this method. Make sure to finish this method by closing your pores (finish up with a pore serum). There are many pore strip/nose pack available out there and you can find them in your local drugstore if you’re looking for the cheap one. If you ask about my favorites, it would be this Skinfood Egg White Pack :

Not only for nose, you can use it on your forehead and jaw too. For forehead and jaw, the strips are triangle.
My another favorite is from Skinfood too, namely Skinfood Black Bean Nose Pack :
This one only for the nose but imo this one is better for the nose than the Egg White one from Skinfood. I heard the Biore’s one is good too however I still haven’t has the chance to try it yet.
So the cons for using this kind of strip/pack is it won’t pick all your blackheads (you still will have blackheads left on your nose), sometime it doesn’t fit certain nose sizes and it’s not really long lasting (the blackheads will come back) but actually it all depends on your hygiene and how often you use your make-ups.
# METHOD 3 : Considerably fast, painless but need a little effort & 50/50
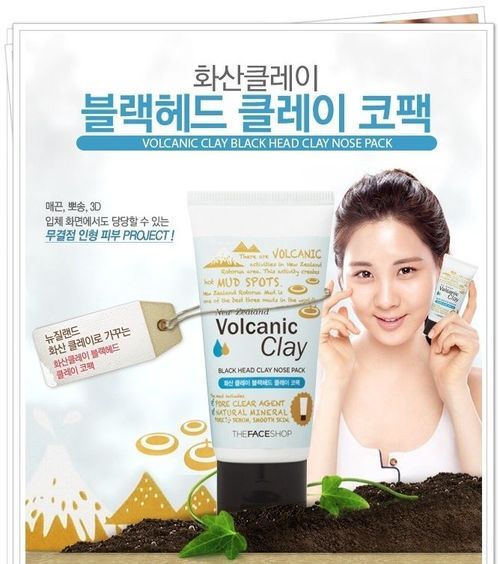
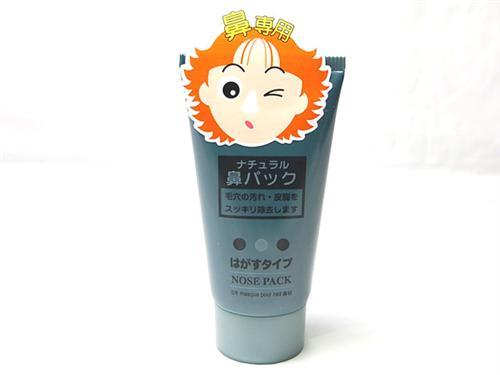
If you’ve made the right guesses for the first-two methods, omedetou (おめでとう) / chuka haeyo! (축하해요) - ( Japanese & Korean words for congratulations! ). I’m sorry that if I like to include Japanese or Korean words sometime, it’s just I want to share basic important words I know with my readers. If you guys don’t like it, please tell me so and I would remove my Korean & Japanese class lol. Alright, so method no 3 is considerably fast as it takes time, it’s painless and need lil effort. 50/50? Lol it’s 50/50 as to 50 it’ll work and 50 it won’t work. Every time I heard or see or read the word “50/50”, it’ll reminds me the crying scenario I had with the doctor //oh the flashback.. lol. Anyway this 50/50 actually quite similar to Method 2 it’s just it’s in liquid form. Yes, it’s Nose Pack. It’s liquidy and you’ll have to apply the nose pack by yourself on the required area then let it dry then peel it off. This actually quite tough to do as it can be messy sometime and when you use too much of the pack, you might end up having a tough time to wait it dry. Actually you can even do this at your home but only if you have a PVA glue. For me, I’ve tried using the PVA glue and honestly the glue not really strong enough to pick my blackheads so yeah useless for me but you still can give a try. As for the 50/50 *oh le flash back again*, it’s depends on which brand you use. For example,The Face Shop New Zealand Volcanic Clay Black Head Clay Nose Pack (such a long name -.-) and Daiso Nose Pack. They’re both categorized on the peeling pack. I’m not sure TFS one working or not but from the review I’ve read, the Daiso one are working well. I am using the other pack from Daiso and it works really well so pretty sure the nose pack also good too (lol my way of thinking). So yeah 50/50 (work/not) mostly depends on the brand.
The other type is the 'melting’ type which it’ll require you to apply on nose as well as wait but not until it dry just wait for 15mins or usually 20mins max. Basically just use it like a mask, after that 15mins/20mins, remove the rest of the pack by washing with warm water then finish off with using cold water to close the pores back. This is 50/50 too but honestly so far with the one I’ve tried for this type, it’s not really working well. Melting type example, The Face Shop New Zealand Volcanic Clay Blackhead Heating Gel Mask ;
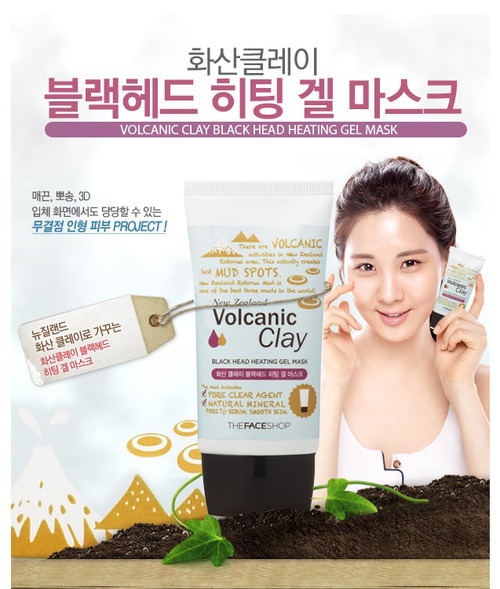
I would say this one works better on whiteheads rather than blackheads and perhaps only for the smaller blackheads.
So the cons for using these kind of packs are it won’t pick all your blackheads (you’ll still have blackheads left on your nose). But the good thing using these kind of packs are it fit all nose sizes.
# METHOD 4 : Time consuming, require effort & need to be more diligent
Method 4 is the most challenging. It’s time consuming, require effort and you’ll be need to be more assiduous. After certain period of your hard work, you can see the result. Even the result might be not too significant, it’s still there and the result actually more long-lasting than the other methods but still you need to practice a good hygiene. This can be considered as the last method experienced by myself. The last method is by using Pore Serum. You can use them everyday after Toner without doing any other methods to actually get rid of your blackheads. Remember that you want to close your pores so there won’t be any new blackheads. If the pores are left open, the formation of blackheads might occur. Example of pore serum is Etude House Wonder Pore Corrector ;
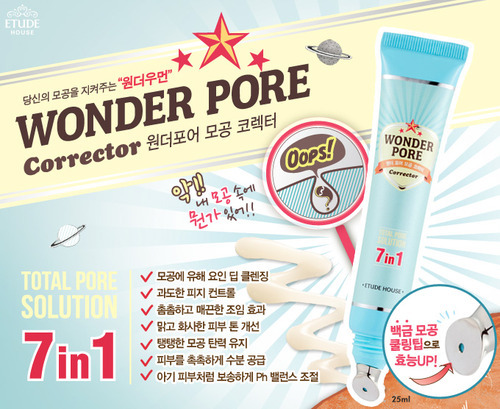
I’m currently using this corrector and it’s time consuming to see the result. You can see the result only at least after two weeks of using. With the help of this corrector in all honesty I can see differences on my nose and it definitely last longer.
# METHOD 5 : Once/twice in a week, fun to do & actually is a big help.
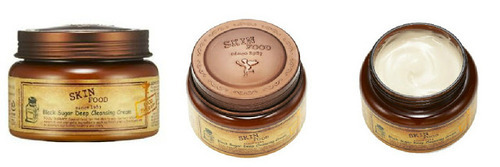
One of the way to prevent formation of Blackheads s by exfoliating. It’s because by exfoliating you can actually draw out impurities from beneath the top layers of your epidermis. It also helps remove dead skin cells and unclog pores so your toning, hydrating and protecting products (skincare products) work more effectively. Exfoliate also help stimulate blood circulation, add in extra nutrients leaving your skin feeling smoother and much softer. However it’s advised to exfoliate onlyy once in a week and better not to do more that once in a week especially if it’s a heavy exfoliation because it can harm and make the skin drier. Exfoliating actually is a fun thing to do, don’t you agree? It’s actually a big help too. My products recommendations for exfoliating are :
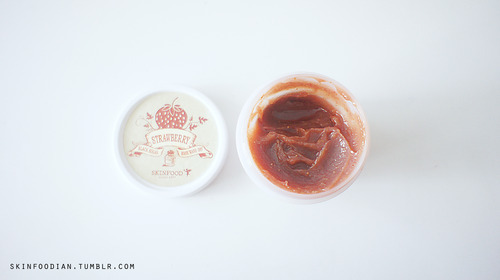
Skinfood Black Sugar Strawberry Wash Off Mask (picture below
) / Skinfood Black Sugar Wash Off Mask / Skinfood Rice Wash Off Mask / Etude House Baking Powder Crunch Pore Scrub / Cure Natural Aqua Gel.
/ Do it natural way by using ;-
1. Sugar / Black Sugar
Mix it with honey, which contains powerful antioxidant and antimicrobial properties, and a little lemon for clarifying purposes, and you have a wonderfully nourishing and effective face scrub. Combine 1 teaspoon sugar with ½ teaspoon honey and a squeeze of fresh lemon juice and mix well. If the mixture is a little loose, add a bit more sugar.
2. Baking Powder / Baking Soda
The grains in baking soda are just the right size to act as a gentle exfoliant, and many claim that it has helped clear up acne. Mix in a teaspoon of baking soda to your facial cleanser to make it an exfoliating cleanser. Or make a paste of just baking soda and water, gently rub it onto your skin and leave it on for 5 to 10 minutes before rinsing off.
3. Rice
Extract of rice is useful in increasing the production of collagen that functions in maintaining skin elasticity. Chemical structure of the rice is known contributing to the regeneration and growth of skin cells that have been damaged or dead. Furthermore it cointains oryzanol substances that can help renew the skin pigment and useful to counteract ultraviolet too. The benefits doesn’t end there, rice contains vitamin E too. Vitamin E are beneficial nourish the skin so it looks younger. Lastly, Ferulic acid in rice useful as an antioxidant and can protect skin from free radicals. To use as an exfoliator, ground coarsely the rice then mix with a little water.
4. Oatmeal
Ground oatmeal not only serves as a wonderful exfoliant, but it also absorbs and removes surface dirt and impurities while leaving your skin nourished and hydrated. It has been known to soothe and heal everything from acne to sunburn to dry, flaky skin. Given its gentle nature, it is also ideal for those with sensitive skin. Combine 1 tablespoon of ground oatmeal with ¼ teaspoon of salt, which boosts the face treatment’s exfoliating properties, and 1 teaspoon of water or olive oil to make it into a paste or just simply mix it with a little water. Gently rub it onto you skin in circular motions, let sit for five to 10 minutes and rinse. The best part using oatmeal is that you can do it everyday as it’s very gentle :D
5. Coffee
Coffee is another fantastic natural exfoliant. It contains caffeic acid, which has anti-inflammatory effects and can boost collagen production. Just as coffee stimulates our body in the morning, it can serve as a skin stimulant as well. To make the scrub, combine 1 tablespoon of ground coffee with 1 tablespoon of water or olive oil. To make this inexpensive face scrub even more economical, save the wet coffee grounds from your brewed morning coffee and use those. If you use olive oil, skip applying a moisturizer afterward, as olive oil will leave your skin super-moisturized.
My Own Methods
Actually there are more methods available out there to get rid of your blackheads but the methods I share above are the one I’ve experienced/tested by myself. But still, don’t worry as I’ll still share some other methods I’ve found on the internet after this. So just like the pure blue big title, my own method. I’ll be talking about the ways I remove my blackheads now. The methods I do to get rid of my blackheads actually are method 1, method 2, method 3, method 4 and method 5. Yes, I’m doing all the methods I’ve suggested all together. It might sounds like too much works need to be done but when you actually do it, you won’t even feel like it’s hard to do because it’s actually the backwards. You’ll actually enjoy yourself doing all the steps because it actually give you a self-satisfaction. Just imagine those tiny, dark spots that have been lingering on your nose suddenly gone and your nose become clean and clear, don’t you feel satisfy at all?
So here’s my regime to get rid of blackheads *this is only for nose

Day 1 : Clean nose - open pores (steam) - extractor - serum
Day 2 : just serum
Day 3 : Clean nose - open pores (steam) - nose strip (/pack) - serum
Day 4 : just serum
Day 5 : Exfoliate - just serum
and the cycle repeats. For extractor I only use once in awhile (probably 2 times in a month) and for the nose strip, I rarely use it too (approximately 2 times a month sometime when I forget, I don’t use it at all, serum and proper cleansing helps a lot). Really, it’s not hard to remove blackheads but what hard is to keep your nose free from it after you’ve removed it that’s why after you’re 'free’ from blackheads, you need to try your best to keep clean from it. Practice better hygiene and don’t stop using the serum. Most of us can’t run from the blackheads so from time to time, you eventually will still get it so don’t be so depress about it. Remember the main key to have a nice skin is by practicing a good hygiene!
Other methods ..
These methods are what I found over the net and honestly I don’t know whether it will work or not and is it safe or not. If you want to try these methods below please consult with your doctor first and do more researches on it.
1. Benzoyl Peroxide
Benzoyl peroxide has an antibacterial effect and may also decrease the chemical reaction that changes the lining of the hair follicle. This may help reduce the plugging that causes comedones. Benzoyl peroxide may be used for a mild case of comedones or to help prevent formation of others.
2. Take Over the Counter Medications
If you are dealing with intractable acne, you may find a good solution in over-the-counter medications. Tretinoin(Retin-A, Avita, Renova) is the mainstay of treatment for whiteheads and blackheads. It is one of those often recommended medicines that are efficient in opening the clogged pores. Moreover, it is a vitamin A derivative that accelerates the removal of dead skin cells. It helps expel the plugged material returning the pore to normal. In case your blackheads are accompanied by bacteria, a topical antibiotic such as clindamycin or erythromycin can do miracles to eliminate your black spots.
3. Hormonal treatments
Contraceptives have often been used for the treatment of blackheads and acne, often with good results.
4. UV exposure
Exposing the skin to sunlight or ultra-violet light encourages it to peel, which helps unblock pores. Sunbathing or using sunbeds may help. However, it is important to discuss this with your doctor. Exposing skin to sunlight, if overdone, also raises the risk of burning and developing skin cancer.
5. Medications
Adapalene is a third-generation topical retinoid, used mainly in the treatment of mild to moderate acne. Many patients with blackheads have had good results. In the USA adapalene is available under brand name Differin, in three preparations - 0.1% cream, 0.1% gel, and 0.3% gel. Since 2010, it has also been available in the USA under the generic name Teva, (0.1% gel). Only the 0.1% cream and 0.1% gel forms are available in Europe.
Or if all the suggested methods are hard, you can always do it naturally.

1. Apply aloe vera pulp (take alow leaf and cut two green layers) on your face and allow to dry for 10 mins. then wash your face. (NOTE: use fresh aloe vera leaf)
2. Toothbrush And Toothpaste. Apply an inch-sized amount of toothpaste on the toothbrush. Wet the toothbrush and wet the affected area. Gently with your toothbrush, scrub the affected area for a small amount of time. Make sure you do not apply too close to the eyes, as the vapours from menthol toothpastes can irritate the eyes. If you have nose blackheads, apply an even smaller amount of toothpaste, and keep well clear from eyes. This method has also been known to work on spots, but is not guaranteed. Always sterilize the toothbrush with boiling-hot water after using this method. Repeat daily until the affected areas are clear.
3. Make a lotion with equal parts of lime juice, almond oil and glycerin. Apply your lotion to your face. It will not only cure blackheads but the discoloring spots on the face too.
4. Warm a small amount of honey and apply on the trouble area. Wash off after 10-15 minutes. (NOTE: Be sure the honey is not too hot if you decide to try that method. It can-and will-burn you to the point of a bloody blister.)
5. Beat an egg white. Be sure not to get the yolk and white mixed up! Apply egg white to the face with fingers. Put 2 ply tissue paper on affected area until dry. This should take about a half an hour, but may take longer. You will know it is dried when the paper gets stiff. Peel off slowly then rinse face with warm water and pat it dry.
6. Olive or almond oil Trick. Rinse your face with warm water to open your pores. Generously saturate a section of washcloth with olive or almond oil. Place a dab of toothpaste (not the gel kind) on the oily washcloth then gently and thoroughly rub the toothpaste over the affected area with the oily cloth. Do it twice if you have a lot of blackheads. Massage it into your whole face if you like. Add more oil or toothpaste as necessary. Wait about 5 minutes then rinse your face thoroughly with hot water and a clean washcloth.
7. Mix equal proportions of salt and lime juice. Apply it to the affected area. Leave it alone while it dries then wash it off. (NOTE: Avoid getting any substances in or around the eye, [lime juice, glue etc …] but if this does occur, wash eye out with water immediately.)
8. Cut a tomato into various shapes and sizes so that it can cover the curves around your nose/face. Wash your face with warm water and pat dry. Place the tomato pieces where your blackheads are and leave for 15 minutes. When time is up, rinse off with warm water. (NOTE: Do not put moisturizer on right away.)
9. Apply cleansing milk to your face. Massage the cleansing milk gently into your skin gently for 5 minutes. This method works best if you do it directly before bed. Apply Vaseline on the infected area and leave it on the whole night. After getting up, squeeze the blackheads. They will come out easily. Wash your face with cold water.
10. Take one table spoon of milk and one table spoon of flavorless gelatin then mix them. Heat the mixture in the microwave for 10 seconds. Apply the mixture to the affected area in the shape of a pore strip. Use a makeup brush, or even a paint brush. Allow it to dry on the affected area. This should take about 10 minutes, but may take longer or shorter. Remove the strips. When you pull the strips off, you will also be removing the blackheads.
11. Toothpaste & salt. Wet your face. Make sure that your face is not too wet before applying the mixture, because this will cause it not to stick. You can also steam your face; this will help with the results. In a bowl or plate, mix about a teaspoon of toothpaste with half a teaspoon of ordinary table salt. Apply to the affected area of your face. If the mixture is too thick or dry add a few drop of water for smoother application. Leave for no more than 5 minutes. Remove the paste if it starts to itch. Scrub the mixture off your face with warm water. Splash your face with cold water. This will help close your pores. It will sting, so dab your face with a towel straight after. Repeat no more than 2 or 3 times a week (NOTE: your skin will feel dry afterwards, but you should wait at least 3 to 5 hours (or over night if you apply before bed) before putting on face moisturizer.)

- Changing your pillowcase regularly helps prevent future breakouts.
- To keep oil away from your face use blotting papers or oil absorbing sheets, Clean and Clear Oil Absorbing Sheets (or CVS oil absorbing sheets) are cheap and effective and can be purchased at any drug store.
- Wash your face daily, avoiding soap. Use an exfoliator scrub or just plain water splashes.
- Always use oil-free moisturizer because you don’t want to clog your pores even more.
- Keep your hair clean. If you have a clean face, grease from hair can slowly run down your face and clog up spots, so try and take a shower everyday, and wash your hair thoroughly.
- Sometimes a pore minimizer can help reduce blackhead breakouts.
- Keep your nails clean. This will prevent dirt and bacteria being transferred from your hands to your face, especially if you’re squeezing spots or blackheads.
- Try not to touch your face excessively to prevent the transfer of oils from your hands to your face.
- Put cold water on your face after you use a treatment so your pores shrink back down and don’t pick up as much dirt.
- Keep checking your progress, and stay on track. If you keep cleansing, your blackheads are guaranteed to disappear!
- Wash your face at least once a day, but try to wash it twice a day if possible - morning and night. Pimples and blackhead disappear within 4 or 5 days.
- Bangs may irritate the skin, so try to tie them up or have them trimmed.
Sources, citations, credits, photo credits :
P/S : Forgive me if there are wrong facts, typos, horrible grammars etc, I’ll read it again and if I noticed the mistakes, I’ll correct it again. Thank you for reading and good luck combating with your blackheads! Don’t make blackheads let you feels down! Nothing to be worry about as most of us have blackheads! Cheeeer up! ^w^